A flexible, project-centered setup for data science
Switch between projects with a keystroke and do not worry about switching build systems. Expedite your data science workflow with this project-centered setup.
In this tutorial you will learn how to link Sublime Text 3 to an environment from Anaconda/Miniconda and execute Python with Sublime REPL. When you switch the project in Sublime, the build system switches as well to the conda environment associated with it.
You might already have existing projects with different conda virtual environments - no worries. This setup can be easily applied to any project that you already have. Note: The guide is written for Windows 10

Photo by Keira Burton from Pexels
TL;DR
May look like many steps, but can be done in <1 min if you have evertyhing at hand. This iw what you need to get going: Sublime Text 3, Package Control, Project Manager, Anaconda/Miniconda and a conda virtual environment.
- Open Sublime Text 3 and ensure you have package control, Sublime REPL and Project Manager. Shortcut to install with the command palette: CTRL+SHIFT+p, type install > Package Control: Install Package > [package name]
- Note the name of your conda env or create a new one
conda create --name example_env python=3.8 -y - Add
C:\Program Files\Sublime Text 3\(or whereversubl.exeresides) to your system environment variables, opencmdin the project directory and open Sublime withsubl . - Add a new project to Project Manager with the command palette via CTRL+SHIFT+p >
Project Manager: Add new project - CTRL+SHIFT+p type
browseand selectPreferences: Browse packages. The explorer opens inC:\Users\[YOURNAME]\AppData\Roaming\Sublime Text 3\Packages\. Navigate toSublimeREPL/config/Python, copy the fileMain.sublime-menuand go back toC:\Users\[YOURNAME]\AppData\Roaming\Sublime Text 3\Packages\. - Open the
Userfolder, create the directoriesSublimeREPL\config\Pythonand pasteMain.sublime-menuinto the directory you just created (C:\Users\[YOURNAME]\AppData\Roaming\Sublime Text 3\Packages\User\SublimeREPL\config\Python). RenameMain.sublime-menuintoexample_env.sublime-menuand open it with Sublime. - Search for the block where
"id": "repl_python_run",and find"cmd": ["python", "-u", "$file_basename"],. We replace"python"with the path to the conda env we want to have linked with the project and save. For example:"cmd": ["C:\\Users\\philipp\\miniconda3\\envs\\example_env\\python.exe", "-u", "$file_basename"],. - CTRL+SHIFT+p find
Project: edit project. Insert the snippet below to define a build system for the project. Replace example_env with the conda env you want.
{
"build_systems":
    [
        {
            "name": "Conda Python example_env REPL",
            "target": "run_existing_window_command",
            "id": "repl_python_run",
            "file": "config/Python/example_env.sublime-menu",
        }
    ],
    ...
}
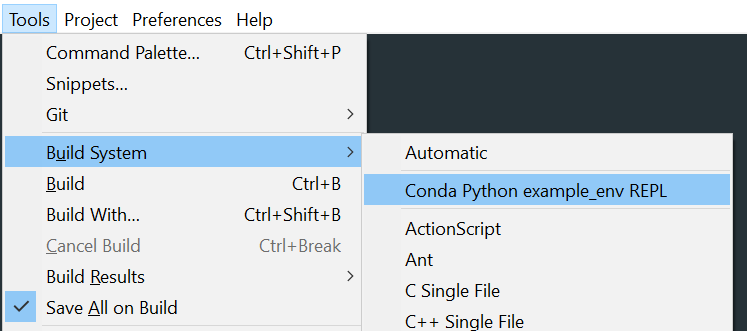
- You should be able to see Conda Python example_env REPL among
Tools>Build System. You can use the Python REPL with the Python of your conda env. Repeat the process for each project.
Awesome! Switch easily between projects with CTRL+ ALT + p and do not worry about the conda environment. The setting is project specific. I hope this expedites your workflow. Have fun with all your future projects!
If you encountered any issues, refer to the more extensive guide below. Let me know when you still have issues, something is unclear or you just want to say hello. Any kind of feedback is much appreciated.
This post was inpspired by community efforts on Stackoverflow . My approach avoids that the Sublime build-system menu will be filled with every virtual environment you link to REPL. Furthermore, the solution here is project-centered or environment-centered instead of a global setting.
Problem
The more projects you have, the more virtual environments you create - the more important project-specific settings become. I experienced this recently when three projects ran in parallel and I had to frequently switch between them. Switching projects and build systems disrupted my workflow. I needed a fast way to switch and have each build system changed as well. My workflow relies on Sublime Text 3, Anaconda and Sublime REPL, so I wanted a solution for these tools. This article suggests a way to smoothly integrate them for a quick & stable project setup.
What do we need for a lightweight and fast Python setup?
- quickly load files with a lightweight text editor –> Sublime Text 3
- switch effortlessly between projects –> Sublime Project Manager
- handle dependencies with virtual environments defined for each project –> Anaconda/Miniconda
- have a build system with an interactive command line –> Sublime REPL
The setup presented here lets you switch between projects and their related virtual environments with CTRL+ALT+p. After selecting another project the build system switches as well to what you have defined in the project settings. A few steps have to be followed, but it is worth it. Hopefully you find this useful, as well.
Before you start
Install the following if you do not have it already:
- Sublime Text 3: https://www.sublimetext.com/3
- Sublime Package Control: https://packagecontrol.io/installation
- Project Manager: https://packagecontrol.io/packages/ProjectManager
- Sublime REPL: https://packagecontrol.io/packages/SublimeREPL
- Anaconda/Miniconda:
https://docs.conda.io/en/latest/miniconda.html
a. I use example_env for the whole tutorial (
conda create --name example_env python=3.8 -y)
This tutorial assumes Windows 10, but should similarly work on Linux. I recommend using Miniconda, see why on Reddit
Solution

Photo by Andrea Piacquadio from Pexels
We installed everything from the above list and have a conda environment. I use example_env as a conda environment. The first step is to center Sublime around the project root folder. In this way, all shortcuts like jumping to a file with CTRL+p relate to the project root ./. Then we initialize the Project Manager.
Let us open a new instance of Sublime at the project root like C:\Users\[YOURNAME]\[PATH-TO-PROJECT]\[PROJECTNAME]. I have Sublime added to my environment variables (find a short how-to below) and open a terminal in the project root directory which is C:\Users\philipp\projects\Sublime project setup. Access the address bar with CTRL+l, type cmd to open command, ↵ Enter. Run subl . (only works if you added subl.exe to your Windows environment variables - find a short howto in the appendix below). An empty Sublime window opens. There you go!
Now we turn towards the Project Manager. Add a new project to Project Manager with the command palette via CTRL+SHIFT+p > Project Manager: Add new project. Check out the project setting file with CTRL+SHIFT+p > Project Manger: Edit project. Sublime stores your project settings here, including project name and path:
{
    "folders":
    [
        {
            "binary_file_patterns":
            [
            ],
            "file_exclude_patterns":
            [
            ],
            "folder_exclude_patterns":
            [
            ],
            "name": "Sublime project setup",
            "path": "C:\\Users\\philipp\\projects\\Sublime project setup"
        }
    ]
}
Next, we define a build system which takes the python.exe of the project conda env, example_env. Note the name of your conda environment. For example, I created an environment with conda create --name example_env python=3.8 -y for this tutorial. So, I use example_env as an environment here.
- CTRL+SHIFT+p type
browseand selectPreferences: Browse packages. The browser opens inC:\Users\[YOURNAME]\AppData\Roaming\Sublime Text 3\Packages\. - From here, navigate to
SublimeREPL/config/Pythonand copy the fileMain.sublime-menu - Go back to
C:\Users\[YOURNAME]\AppData\Roaming\Sublime Text 3\Packages\, openUserand create the following folders:SublimeREPL\config\Python. - Now you are in
C:\Users\[YOURNAME]\AppData\Roaming\Sublime Text 3\Packages\User\SublimeREPL\config\Pythonand paste theMain.sublime-menuinto the directory. - Rename
Main.sublime-menuintoexample_env.sublime-menuand open it with Sublime - Important step: Search for the block where
"id": "repl_python_run",, replace"cmd": ["python", "-u", "$file_basename"],with"cmd": ["C:\\Users\\[YOURNAME]\\[PATHTOCONDA]\\envs\\example_env\\python.exe", "-u", "$file_basename"],and save. Note: Replace the path with any path that leads to thepython.exeof your conda environment. In my case this isC:\\Users\\philipp\\Miniconda3\\envs\\example_env\\python.exe. - Open the command palette with CTRL+SHIFT+p find
Project: edit projectand select the project name. Now we define the build systems that use the Python of our conda environment,example_env. Copy-paste the following snippet and replaceexample_envwith the name of your environment. Important: There are 2 replacements in total.
{
    "build_systems":
    [
        {
            "name": "(REPLACE) Conda Python example_env REPL",
            "target": "run_existing_window_command",
            "id": "repl_python_run",
            "file": "(REPLACE) config/Python/example_env.sublime-menu",
        }
    ],

    "folders":
    [
        {
            "binary_file_patterns":
            [
            ],
            "file_exclude_patterns":
            [
            ],
            "folder_exclude_patterns":
            [
            ],
            "name": "example project",
            "path": "C:\\Users\\[YOURNAME]\\Projects\\example_project"
        }
    ]
}
- Save the file, go to
Tools/Build systemsin the menu bar. Here you should see your project-specific build systems and select it
To briefly test the setup, create a new file like test.py and insert
import sys
print(sys.executable)
print(sys.version)
Run the file with our build system (here: Conda Python example_env REPL):
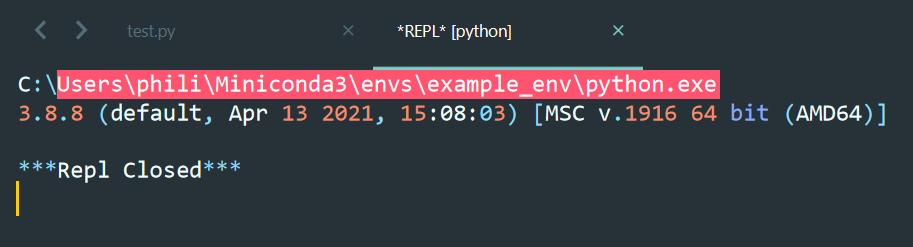
I hope it is working until now. If not, please drop me a message or leave a comment!
Usage
This setup reveals its strength when you work on several projects in parallel. You can (i) switch between projects in no time with CTRL+ ALT + p and (ii) have the related virtual environment among your build systems.
To set up a new project, start out with subl . from the command line and repeat all steps from the Solution section. Doing this around two times, it will come natural in <1 min.
I am sure there are other approaches and project setups which I not yet figured out. So, I appreciate any tips and best practices for project settings in Sublime, REPL and Anaconda.
If there is someone who wants to automate the process and implements a project-based build system for Sublime REPL - I would be grateful! I think many others would benefit from this. It would link the best tools from the Sublime-Anaconda and REPL-world.
Conclusion
In this tutorial you learned how to set up Sublime REPL and link it to your conda environment. In this way you can have several environments across projects and switch easily with Sublime’s Project Manager and its shortcut CTRL+ ALT+p. Have fun with your new setup and enjoy your projects!
Drop me a message if you found this helpful or even encountered some issues with the setup. Feedback is greatly appreciated!
Looking further for intermediate tips and tricks to develop your data science workflow? Stay tuned for the next post within the coming week.
Appendix
How to add subl.exe to environment variables
Shortcut for Windows users: Hit Windows key, type env and select Edit environment variables for your account from the search results.
Then click Path > Edit > New > C:\Program Files\Sublime Text 3\ > OK. Replace C:\Program Files\Sublime Text 3\ with the directory where you find subl.exe. Also see
this tutorial
Resources
https://stackoverflow.com/questions/38214656/using-different-conda-envs-with-sublime-repl
http://damnwidget.github.io/anaconda/anaconda_settings/
https://www.reddit.com/r/datascience/comments/byy98j/anaconda_is_bloated_set_up_a_lean_robust_data/