You will learn how to connect mosquitto running on raspberry pi to AWS iot cloud services. We will connect a local setup with sensors that send data via MQTT to a message broker, hosted on a raspberyy pi, to the AWS cloud.
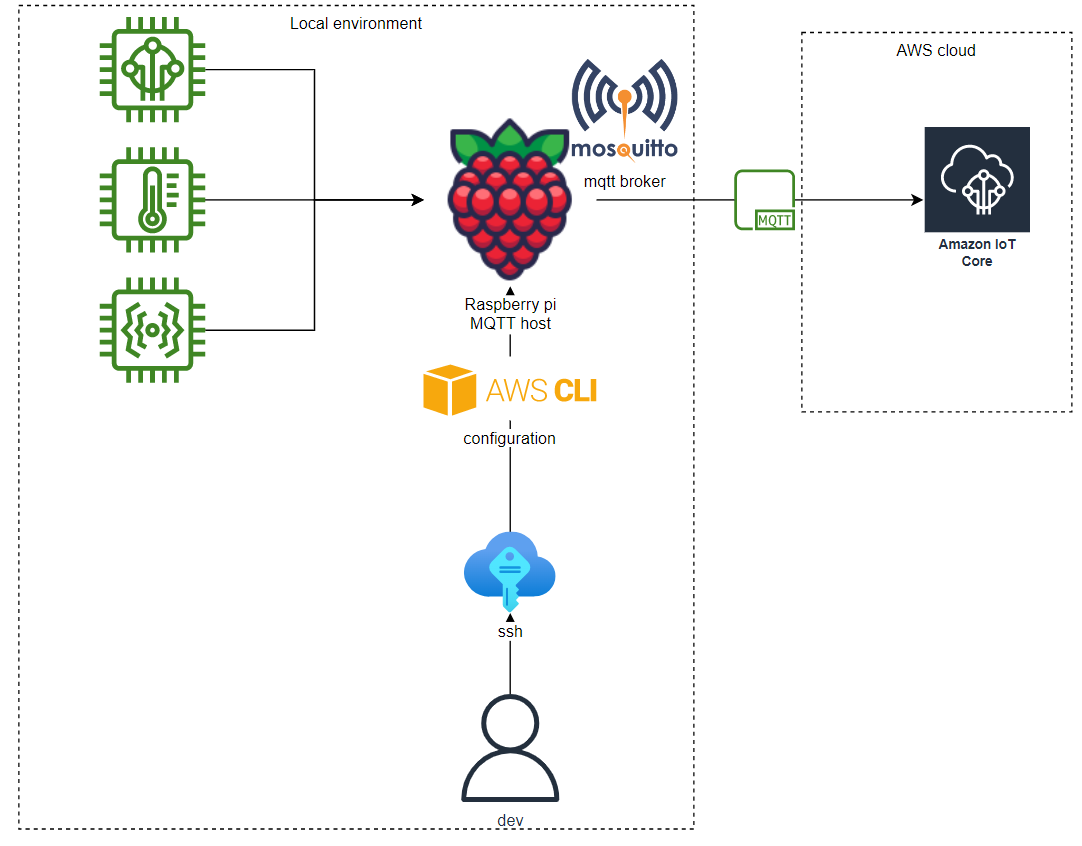
The setup is a cost-effective way to tap into the potential of AWS IoT. For example, we could ingest messages into a data streaming service like Apache Kafka where [AWS MSK] ( https://aws.amazon.com/msk/ ) is the fully managed solution on AWS.
This article builds on [How to Bridge Mosquitto MQTT Broker to AWS IoT] ( https://aws.amazon.com/blogs/iot/how-to-bridge-mosquitto-mqtt-broker-to-aws-iot/) , fixes errata and slightly adapts it for a raspberry pi. Additionally, here is a great article on [mosquitto MQTT Bridge] ( http://www.steves-internet-guide.com/mosquitto-bridge-configuration/) , in general.
Install & configure mosquitto
We need to install and configure a MQTT broker, such as mosquitto. Install it with apt and
configure it by creating a mosquitto.conf file located in /etc/mosquitto/mosquitto.conf.
Additionally, we create a user and store the password encrypted in a passwd file.
# installation
sudo apt update && sudo apt upgrade sudo apt install -y mosquitto mosquitto-clients sudo systemctl
enable mosquitto.service
# disable anonymous access for security
sudo nano /etc/mosquitto/conf/mosquitto.conf
# Place your local configuration in /etc/mosquitto/conf.d/
#
# A full description of the configuration file is
# at /usr/share/doc/mosquitto/examples/mosquitto.conf.example
per_listener_settings true
pid_file /run/mosquitto/mosquitto.pid
persistence true persistence_location /var/lib/mosquitto/
log_dest file /var/log/mosquitto/mosquitto.log
include_dir /etc/mosquitto/conf.d
allow_anonymous false listener 1883 password_file /etc/mosquitto/passwd
# create a user with password
sudo mosquitto_passwd -c /etc/mosquitto/passwd YOUR_USERNAME
sudo systemctl restart mosquitto
# check status of service
sudo systemctl status mosquitto
> ... active ```
## Install & configure aws cli version 2 on raspberry pi
```bash git clone https://github.com/aws/aws-cli.git && cd aws-cli && git checkout v2 pip3
install -r requirements.txt && pip3 install . aws --version
> aws-cli/2.8.0 Python/3.9.2 Linux/5.15.61-v7l+ source/armv7l.raspbian.11 prompt/off
#Configure the AWS CLI with your AWS region, such as eu-west-1, leave access/private keys blank
aws configure ```
## Connect mosquitto to AWS IoT Core
```bash
#Create an IAM policy for the bridge
aws iot create-policy --policy-name bridgeMQTT --policy-document '
{"Version": "2012-10-17","Statement": [{"Effect": "Allow","Action": "iot:*","Resource": "*"}]}'
#Place yourself in Mosquitto directory and download the Amazon Root CA #certificate
cd /etc/mosquitto/certs/ sudo wget https://www.amazontrust.com/repository/AmazonRootCA1.pem -O
rootCA.pem
#Create certificates and keys. Make a note of the certificate ARN as it will be #needed to configure
#the IoT Policy.
sudo aws iot create-keys-and-certificate --set-as-active --certificate-pem-outfile
cert.crt --private-key-outfile private.key --public-key-outfile public.key --region eu-west-1
# NOTE: if this throws an exception, run `aws iot create-keys-and-certificate`, in
# `/etc/mosquitto/certs/` create cert.crt, private.key, public.key with the information from the
# console
#Copy the ARN of the certificate returned by the command line in the form
#of #arn:aws:iot:eu-west-1:0123456789:cert/xyzxyz and replace it in the following #command line in
#order to attach the IoT policy to your certificate
aws iot attach-principal-policy --policy-name bridgeMQTT --principal <certificate ARN>
#Add read permissions to the private key and the public certificate
sudo chmod 644 private.key sudo chmod 644 cert.crt
#Retrieve the value of the AWS IoT Core ATS endpoint for your AWS Region using #the cli and make a
#note of it.
aws iot describe-endpoint --endpoint-type iot:Data-ATS
#Create the configuration file
sudo nano /etc/mosquitto/conf.d/bridge.conf
# ============================================================ Bridge to AWS IOT
# ============================================================
connection awsiot
#<Paste your AWS IoT Core ATS endpoint retrieved from the AWS CLI in the form of
#xxxxxxxxxxxxxxx-ats.iot.<region>.amazonaws.com:8883
address xxxxxxxxxxxxxxx-ats.iot.<region>.amazonaws.com:8883
# Specifying which topics are bridged and in what fashion
topic awsiot_to_localgateway in 1 topic localgateway_to_awsiot out 1 topic both_directions both 1
# Setting protocol version explicitly
bridge_protocol_version mqttv311 bridge_insecure false
# Bridge connection name and MQTT client Id, enabling the connection automatically when the
# broker starts.
cleansession true clientid bridgeawsiot start_type automatic notifications false log_type all
# ============================================================ Certificate based SSL/TLS support
# ============================================================
#Path to the rootCA
bridge_cafile /etc/mosquitto/certs/rootCA.pem
# Path to the PEM encoded client certificate
bridge_certfile /etc/mosquitto/certs/cert.crt
# Path to the PEM encoded client private key
bridge_keyfile /etc/mosquitto/certs/private.key
#END of bridge.conf
#Restart the Mosquitto Mosquitto broker
sudo service mosquitto restart ```
## Publish message to AWS IoT MQTT test client
Sign in to AWS and navigate to AWS IoT > MQTT test client. Enter the topic `localgateway_to_awsiot`,
set quality of service to 1 under advanced configuration and hit `subscribe`.
Important note: Make sure to select the same region as when you run `iot
create-keys-and-certificate ... --region <your-region>`. In the example above, we used eu-west-1
(Ireland).
```bash
#Publish a local message to the Mosquitto broker running on the Amazon EC2 #instance from the
#terminal
mosquitto_pub -h localhost -p 1883 -q 1 -d -t localgateway_to_awsiot -i localClientID -m "
{\"message\": \"helloFromLocalGateway\"}" -u YOUR_USERNAME -P YOUR_PASSWORD ```
